Introduction
The Google Workspace Marketplace is a vibrant ecosystem that allows developers to showcase their apps and extensions to users of Google Workspace, which includes popular productivity tools like Gmail, Google Drive, Google Calendar, and more. Publishing your app in the marketplace can help you gain exposure, acquire new customers, and grow your business. So, let’s dive into the step-by-step process of publishing your app in the Google Workspace Marketplace!
Are you ready to reach millions of potential users? Have you considered publishing your app on the Google Workspace Marketplace? 🌐📲
If that’s the case, this is the correct tutorial for you.
Here are the steps a developer should follow:
- Plan Your App
- Develop and Test Your App
- Create a Project in Google Cloud Console
- Configure OAuth Consent Screen
- OAuth Review an Approval
- Configure the Google Workspace Marketplace SDK and Publish Your App
- App Review and Approval
Ok, so let’s review step by step.
In this post, our main focus will be on publishing a Google Sheets app in the Google Workspace Marketplace. However, it’s worth noting that other applications generally follow a similar process for app publication.
Before starting, Matchkraft has successfully published three apps:
- Fuzzy Matching Company Names for Google Sheets
- Free Emial Permutator for Google Sheets
- Company Name to Url for Google Sheets
Plan Your App
In this tutorial, our objective is to publish a Google Sheets application related to MatchKraft. MatchKraft is a robust software designed specifically for digital marketers, offering a range of powerful tools. Among the common tasks performed by digital marketers is the creation of email permutations using first and last names along with company domains. During our exploration of the Google Workspace Marketplace, we discovered a need for a tool that could provide such email permutations. This realization led to the birth of MatchKraft’s free email permutation app.
Develop and Test Your App

Let’s dive into app development! To get started, you’ll need to construct a user interface (UI) that effectively executes your app. For detailed guidance, I recommend referring to Google’s documentation on app building. In addition, here are some essential tips to keep in mind:
- Craft an appealing and intuitive User Interface that adheres to Google’s regulations.
- Thoroughly test your app to ensure it performs flawlessly.
- Since Google will review your app, it’s crucial to make it bug-free.
- Don’t forget to leverage the onInstall and onOpen functions.
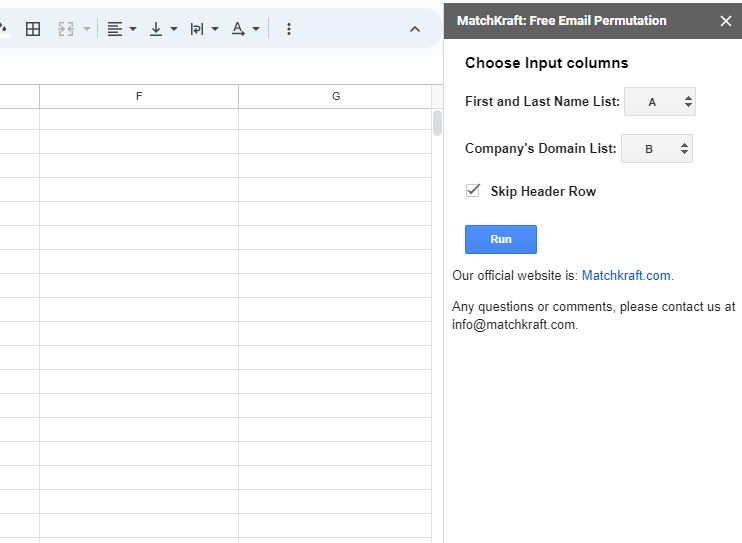
Following these recommendations will set you on the path to success in creating your app! Here is a screenshot of the user interface that I built.
Nevertheless, this tutorial’s emphasis is on app publication rather than app programming. If you have any inquiries about creating an app from scratch, please feel free to reach out to me at info@matchkraft.com. I am available to provide further assistance, whether it’s through a blog post or by sharing additional tips.
Create a Project in the Google Cloud Console
Let the fun begin! Once your app development is complete, the next exciting step is publishing it in the marketplace. This process can be a bit tricky, but fear not! This post is here to guide you through it, and I’m confident it will provide the help you need.
To start, you’ll need to create a project in Google Cloud. Simply head over there and locate the “Create New Project” button, then click on it. This will set you on the right path towards successfully publishing your app.
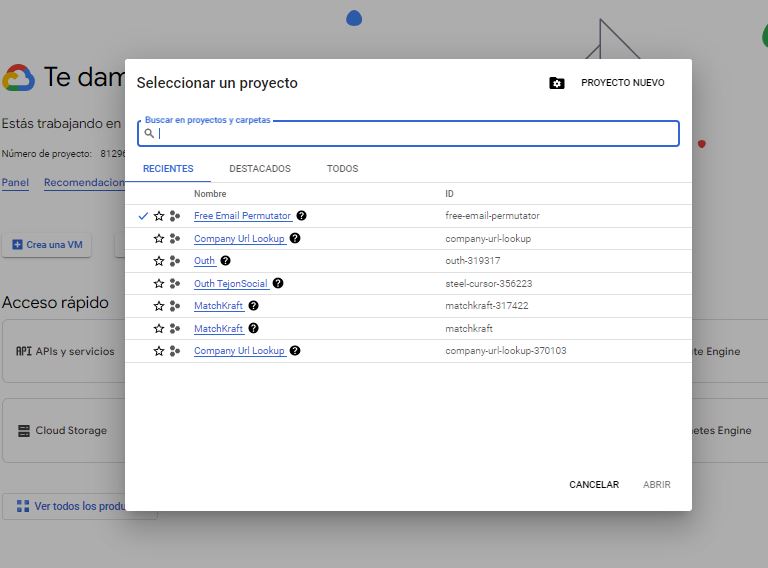
You should see something like this when you click the button:

Important, the name should be the same as the name of your app. In my case, my app was called free email permutator and I put that name. In this tutorial, you will see either free email permutator or Company Url LookUp (that’s because I took screenshot for both apps). But in your case, you shoud use the name of your app.
Ok for step 1 that’s all. Easy right, but next step will be a little bit tricky.
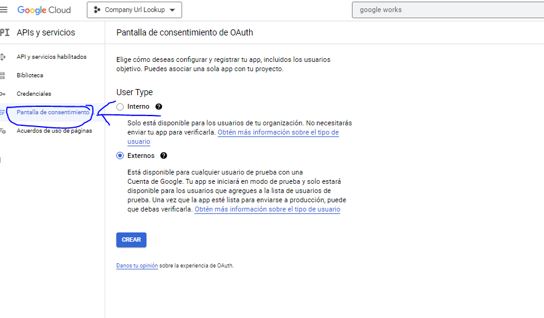
Configure OAuth Consent Screen
An OAuth screen is necessary to showcase the access requirements of our app, allowing users to grant or deny access. This enables us to obtain crucial information like their email or other important data.
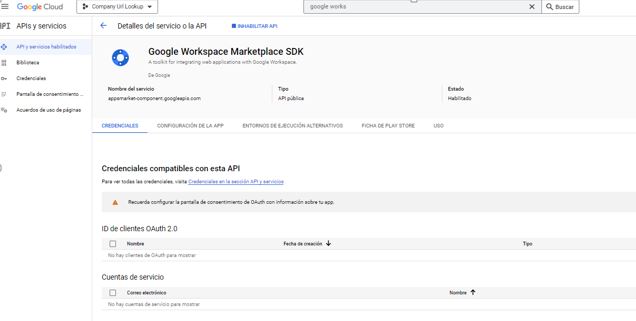
To achieve this, we must install the Google Workspace Marketplace SDK. You can easily find it by searching in the search bar. Here is an image for reference:

No need to worry; take your time to search for the toolkit. Finding it can sometimes take a bit of effort. When I first looked for it, it took me around 15 minutes as well. Just remember, you can search for it in the search bar at the top or navigate to the API and Services section. Take your time, and you’ll find it!

Now, go ahead and click on the “Install” button to initiate the installation process and create the OAuth screen for your app. Once you have installed it, you should see a screen similar to this:
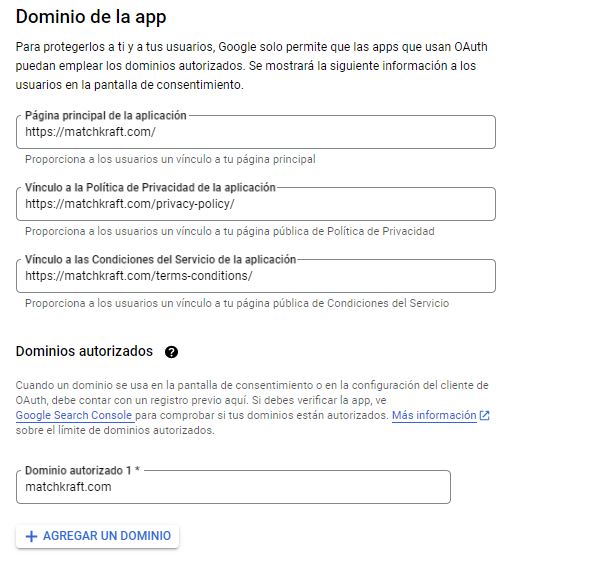
Furthermore, it is essential to establish a connection between your app and the Google Cloud Platform. This connection is necessary to undergo the verification process successfully. Without this connection, you may encounter errors.
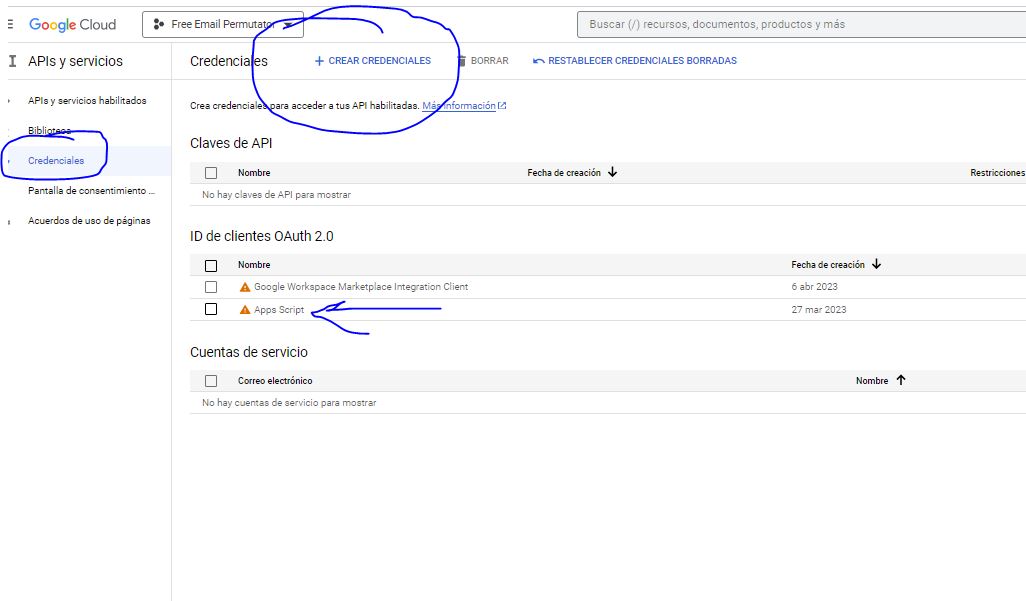
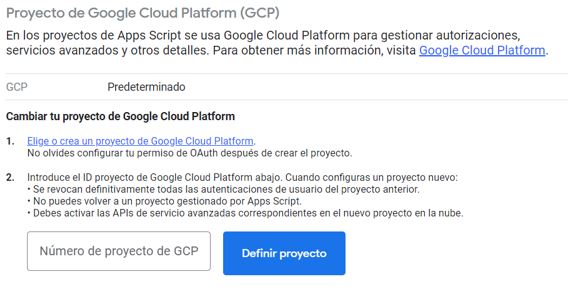
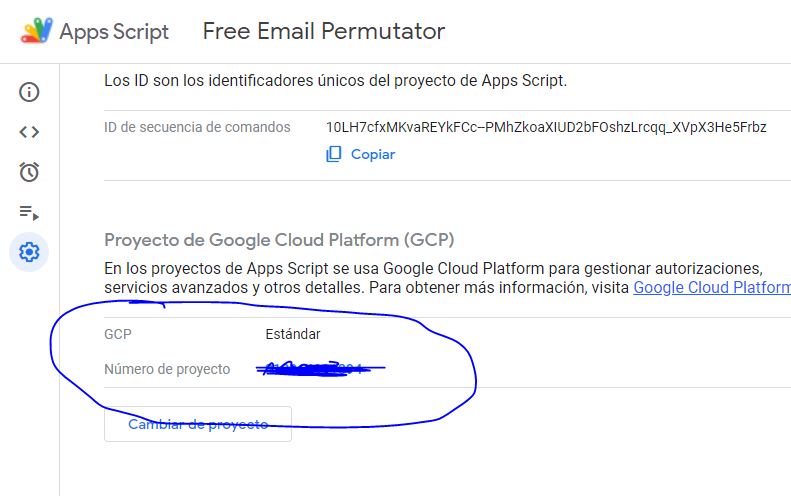
To establish the connection between both platforms, simply enter the ID of your project in the designated field. You can easily obtain the ID by referring to the following location:
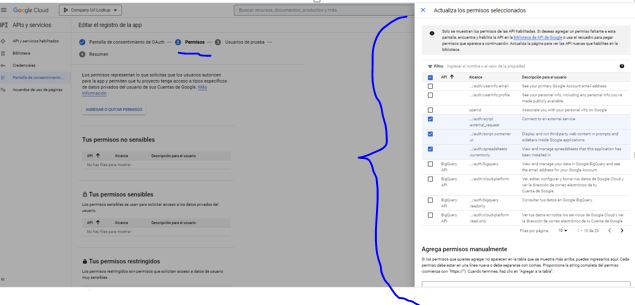
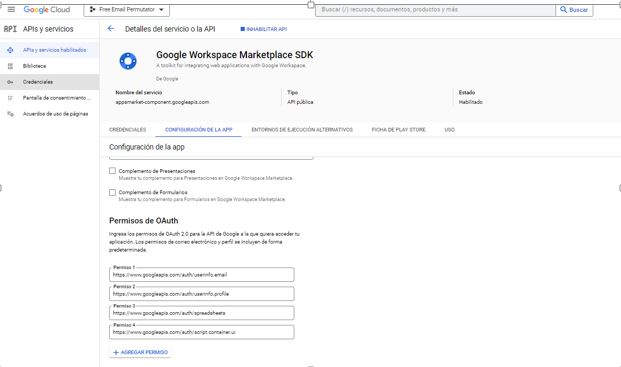
Before proceeding with creating a new consent screen, it’s important to gather additional information from your app. Specifically, we require the OAuth permissions from your project. To access these permissions, navigate to the App Script section within your Google Sheets app. In my case, I typically have three permissions that I request from users. However, feel free to include any additional permissions that your app requires. Here is a screenshot for reference:

Now, let’s return to the process of creating the consent screen. In the highlighted section, you’ll notice the “Create” button located at the bottom. This is where you can proceed with creating your consent screen.
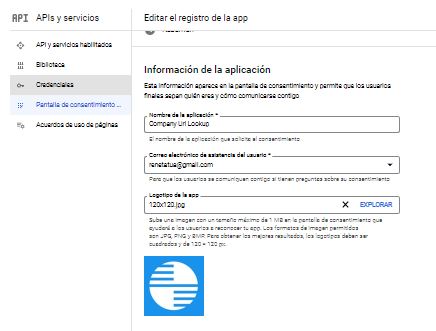
Click on the “Create OAuth” button, and you will be presented with a form where you can add the permissions you obtained earlier. Here is a screenshot of the form for your reference:
As you can observe, there are four steps involved in the process. In step two, make sure to include all the permissions you gathered. Once you have completed all the steps, you should see the following screen:
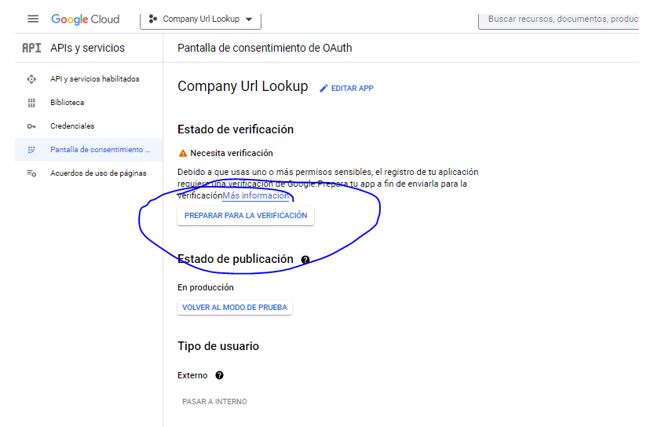
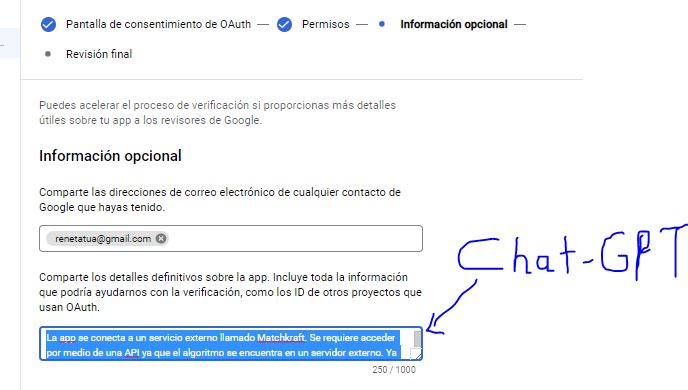
Indeed, you will notice the “Prepare for Verification” button. However, it is necessary to press it once more and repeat the previous step. The reason for this repetition may not be clear, but it is advisable to follow this process. The Google form will present the same set of questions as before. Simply review the questions carefully and provide detailed and well-founded answers for each. I will provide you with screenshots of how I answered the questions. Feel free to leverage ChatGPT for crafting comprehensive responses. Google generally appreciates longer answers with substantial justifications.
Additionally, it’s crucial to prepare a high-quality video as you will be required to submit one. This video serves as a demonstration or showcase of your app. Here is an example of a video that I created for reference:
Make sure your video effectively highlights the features and functionality of your app, providing a clear understanding of its value to potential users. A well-prepared video can significantly enhance your app’s presentation during the review process.
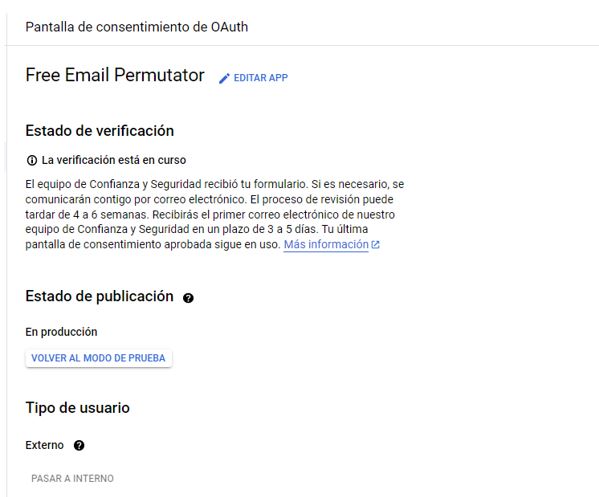
Ok, when you finish, you will see this screen:
After completing the submission process, you will need to exercise patience and allow approximately one week for the approval process to take place. The duration may vary slightly, but typically within this timeframe, you can expect to receive an update regarding the status of your app’s approval. During this waiting period, it’s advisable to remain engaged and prepared to address any additional inquiries or requests from the review team.
OAuth Review an Approval
After the initial one-week waiting period, it’s possible that you may receive an email from Google if there are any issues or concerns with your app submission. This email serves as a notification to inform you of the situation and may provide specific instructions or requests for further action on your part. It’s essential to carefully review the email and follow the provided guidance to address any identified issues. By promptly addressing these concerns, you can increase the chances of obtaining approval for your app in the Google Workspace Marketplace.
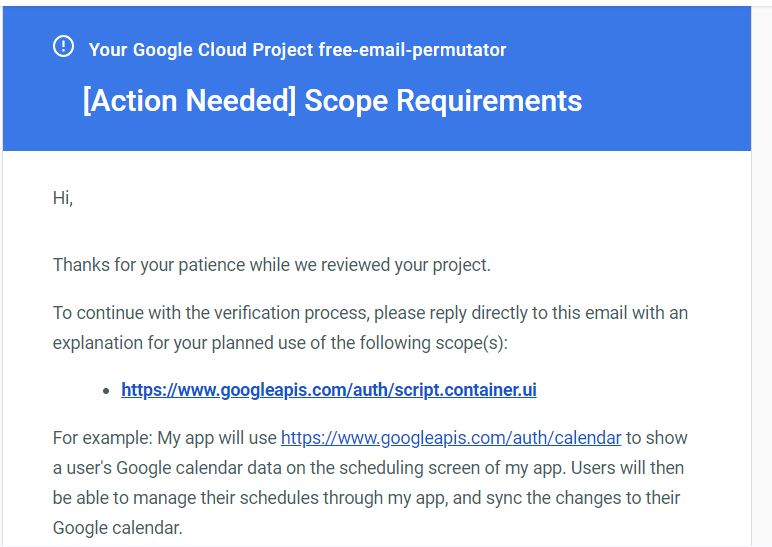
Once you receive instructions from Google regarding any issues with your app submission, it is crucial to carefully follow the provided instructions. By doing so, you can address any concerns and ensure that your app meets the necessary requirements for approval. After taking the necessary steps, you will need to wait for approximately another week as Google reviews your consent screen. During this time, it’s recommended to remain patient and optimistic while anticipating a positive outcome. If you have any questions or require assistance, feel free to use Chat GPT to craft a well-informed and helpful response.
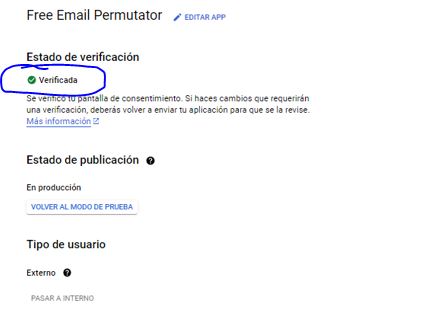
Congratulations! Your consent screen has successfully passed the verification process. This is a significant milestone in the app publishing journey. With your consent screen now verified, you have cleared a crucial step towards making your app available to users. It’s an exciting achievement that brings you one step closer to reaching your audience and offering your app to the world. Well done on successfully completing this important phase of the process!
Configure the Google Workspace Marketplace SDK and Publish Your App
Now that we have the verified consent screen, we can proceed to the next step, which is publishing your app in the Google Workspace Marketplace using the Google Workspace Marketplace SDK. Earlier in the process, we installed this toolkit to aid us in the app publication journey. It serves as a valuable tool for managing and publishing your app in the marketplace. With the consent screen in place, we are now ready to utilize the capabilities of the Google Workspace Marketplace SDK to make your app available to users. Let’s move forward and explore how to navigate this essential step in the app publishing process.

Now, you after you click there, you will see the following image:
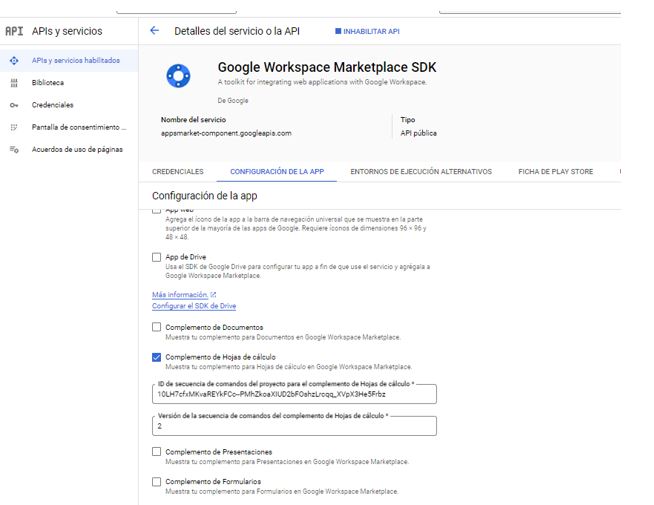
As depicted, the Google Workspace Marketplace SDK interface consists of four tabs at the top: Credentials, Play Store, etc. When it comes to publishing your app, there are a few details that might require extra attention, such as identifying the ID of commands and the version number. Although this aspect may initially seem challenging, it is actually quite straightforward. To retrieve the necessary information, you need to access the Google Sheets app script and click on the “Implement” button. This action will provide you with a version number associated with your app. Allow me to demonstrate this process for further clarity:
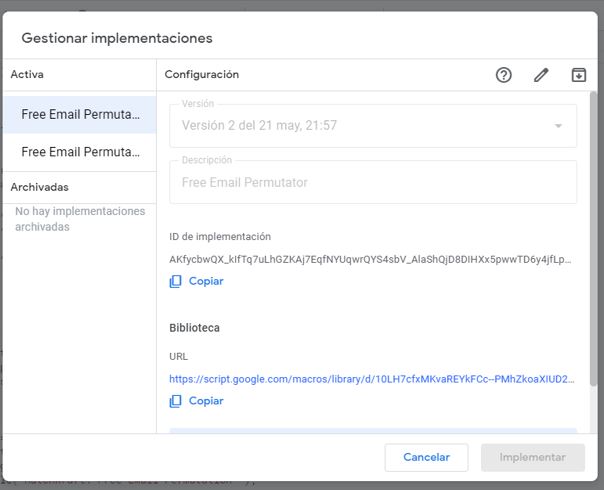
As you can see the version of my app is 2. Normally, if you do this the first time, you will get version 1.
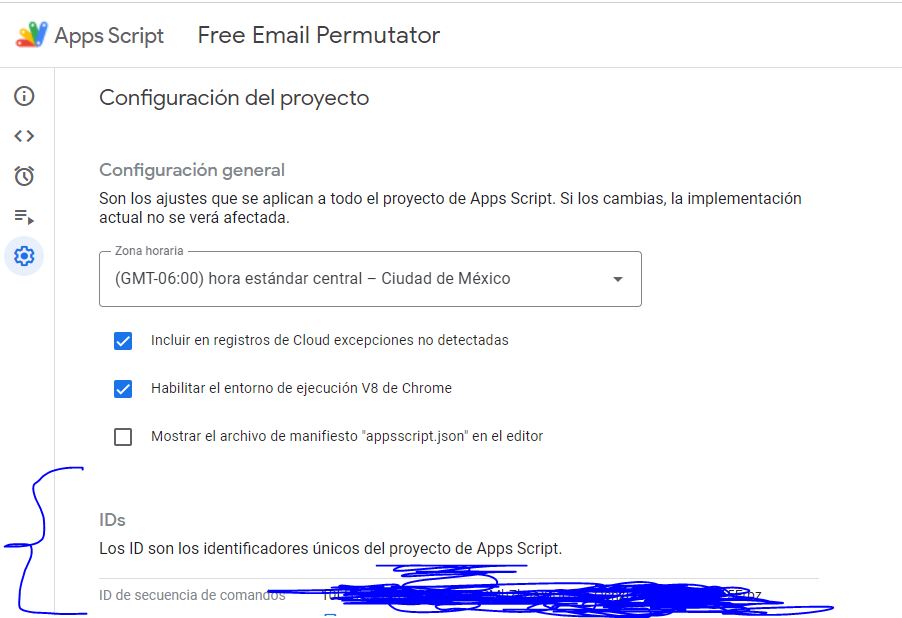
The id can be found here:
You will need to submit your OAuth permissions again:
Alright, it’s time to create your app marketplace profile. Let’s take a look at some images that will guide you through the process:
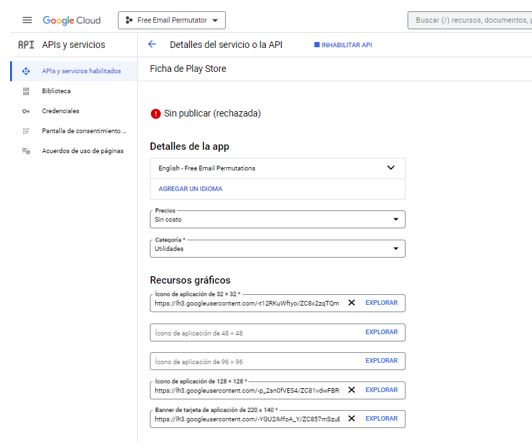
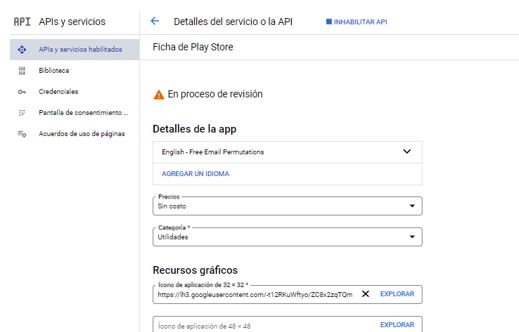
To successfully publish your app in the marketplace, you need to submit various components, including screenshots, app icon, and a description. It’s crucial to ensure that your app is bug-free as Google may reject it if they encounter any issues or are unable to test it properly. If your app gets rejected, you will receive a notification with the “Rejected” status displayed at the top. Pay attention to Google’s feedback and address any concerns or bugs before resubmitting your app for review. Remember, a thorough and well-tested app increases your chances of approval.
App Review and Approval
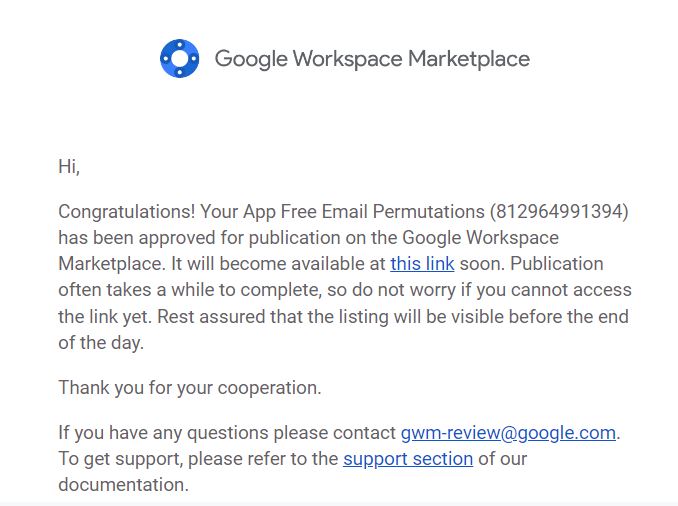
Congratulations! If you have followed all the steps correctly, you will receive a message from Google notifying you of the successful publication of your app. This message serves as confirmation that your app has been approved and is now available in the Google Workspace Marketplace. It’s a moment of achievement and a testament to your hard work and dedication throughout the app publishing process. Take a moment to celebrate this milestone and get ready to share your app with users worldwide.
Conclusion
The Google Workspace Marketplace offers a thriving ecosystem where developers can showcase their apps and extensions to users of Google Workspace’s popular productivity tools. Publishing your app in the marketplace not only increases exposure but also helps you acquire new customers and grow your business.
Throughout this tutorial, we covered crucial aspects of the publishing process, including planning your app, developing and testing it, creating a project in the Google Cloud Console, configuring the OAuth consent screen, utilizing the Google Workspace Marketplace SDK, and finally, undergoing the app review and approval stage.
It’s important to note that this tutorial primarily focuses on publishing a Google Sheets app, but the general process applies to other applications as well. Matchkraft, for example, successfully published three apps, including Fuzzy Matching Company Names for Google Sheets, Free Email Permutator for Google Sheets, and Company Name to URL for Google Sheets.
Remember, creating a compelling user interface, extensively testing your app, and adhering to Google’s regulations are essential for a smooth publication process. If you have any questions or need further assistance, please don’t hesitate to reach out to us at info@matchkraft.com. We are more than happy to provide additional tips or create posts tailored to your specific needs.
Now, armed with the knowledge gained from this tutorial, you’re ready to embark on the exciting journey of publishing your app in the Google Workspace Marketplace. Share your creation with the world and enjoy the endless possibilities that come with reaching a vast user base. Best of luck!